
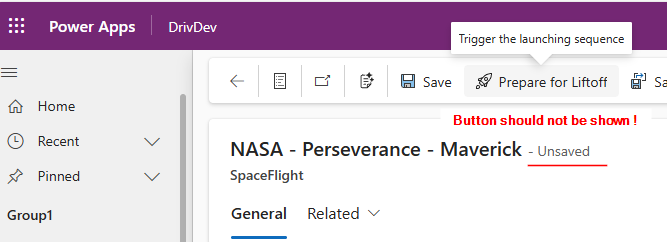
I recently encountered a requirement on a model-driven app project to display a custom ribbon button only when the form had no unsaved changes—in other words, the button needed to be hidden whenever the form was dirty.
While the solution is quite simple, I thought it would be a good idea to write about it and put all the pieces of the puzzle together. I also explore and provide a solution for the 2 current button extension models—the Classic Ribbon and the Modern commanding .
Classic Ribbon vs Modern Commanding
If you’re familiar with custom button development for model-driven apps, you know there are currently two extension models: the Classic Ribbon and the Modern commanding experience. See the official doc below.
🔗Command designer overview - Power Apps | Microsoft Learn
🔗Command bar customization limitations - Power Apps | Microsoft Learn
🔗Customize commands and the ribbon (model-driven apps) - Power Apps | Microsoft Learn
Despite Microsoft advocating for Modern commanding over the Classic Ribbon, I personally feel more comfortable with the classic approach and have often encountered limitations with the Modern experience.
But let’s not dive into politics here (we’ve already got enough of that these days 😉). Instead, I’ll walk through solutions for both extension models, so you can choose the best fit for your needs.
Detecting Form State – Classic Ribbon
The first step is quite obvious, we need to check the form’s state to see if there are any unsaved changes. Fortunately, the client API provides a method that can be used in both form and ribbon JavaScript customizations to accomplish this.
formContext.data.entity.getIsDirty();
🔗entity.getIsDirty (Client API reference) - Power Apps | Microsoft Learn
Using this method, let’s create a simple function in a JavaScript web resource that will assess whether our button should be shown or not, depending on the getIsDirty status. We will use it to configure the button enable rule in the next step.
//Ribbon Enable Rule
function ShowWhenNotDirty(primaryControl) {

    let formContext = primaryControl
    let isDirty = formContext.data.entity.getIsDirty()

    return !isDirty

}
Configuring the button Enable Rule
Of course I will be using the amazing Ribbon Workbench for XrmToolBox by Scott Durow. If you’ve been living under a rock, mastering this tool is an absolute must for anyone serious about Model-driven app ribbon customization.
🔗Develop 1 Ltd | Ribbon Workbench for Dynamics 365 & Dynamics CRM
Since there are plenty of great resources available to help you get started with custom buttons and actions, I’ll skip the basics and focus solely on setting up the enable rule of the button.
Let’s say we already created a button and its command using the Ribbon Workbench. For now the button’s command only executes a custom JavaScript function when clicked.
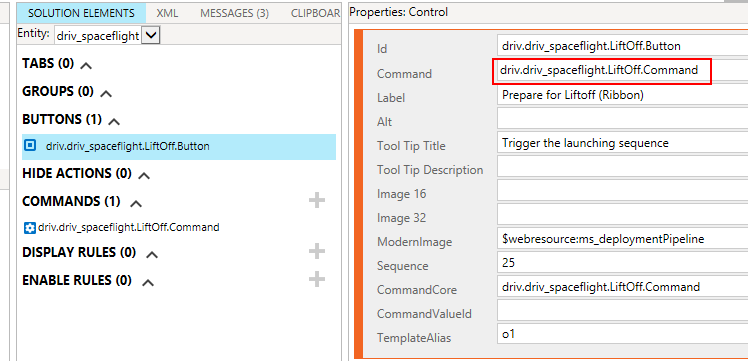

To set a dynamic visibility rule for the button, simply add an Enable Rule to the command

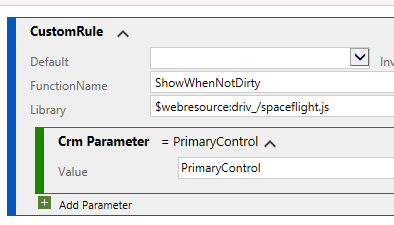
And add a Custom Rule step
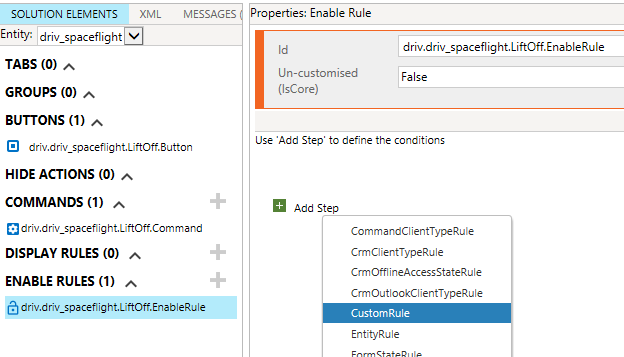
Hook the custom rule to the ShowWhenNotDirty JavaScript function defined earlier. Don’t forget to add the Crm Parameter named PrimaryControl to the rule parameters otherwise the form context will not be passed to the function.
And that’s all there is for the button configuration. Now let’s achieve the same functionality using the Modern commanding experience.
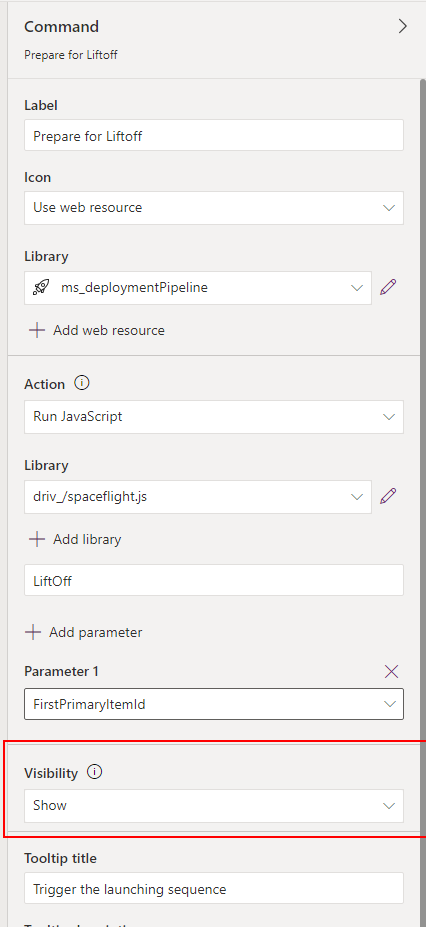
Detecting Form State – Modern Commanding
Things are a bit different with the Modern commanding model. At the time of writing, even if it is possible to link a custom JavaScript function to the button command (action), only PowerFx functions are allowed for the visibility rules.
No issue here since there is an Unsaved form state provided by the Selected object injected by the host and available in PowerFx expressions.
Our visibility rule can now be expressed like this.
Not(Self.Selected.Unsaved)
🔗Use Power Fx with commands - Power Apps | Microsoft Learn
Again, I won’t go into all the details of setting up the button and will focus only on configuring the visibility rule.
Starting with an existing button that has no visibility rule (Visibility is set to Show).
Change the Visibility to Show on condition from formula and put the PowerFx expression specified above.
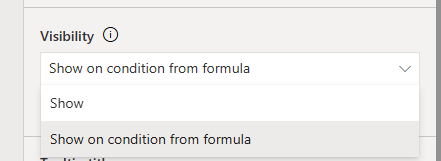

Simple as that! I have to admit, the setup is much easier with the Modern commanding approach.
Refreshing the ribbon on form change
At this point, you might be disappointed to see the button will still be displayed when the form state becomes unsaved—but there’s a good reason for that.
Natively, the ribbon is only refreshed during the onLoad event of the form, causing all visibility rules of the ribbon to be evaluated at this time.
Since the form’s unsaved status is set during the user session and after the initial load, it doesn’t really help in this case. We need to explicitly refresh the ribbon whenever form attributes change by invoking the following function.
formContext.ui.refreshRibbon()
🔗ui.refreshRibbon (Client API reference) in model-driven apps - Power Apps | Microsoft Learn
The hard way to achieve this would be to manually add this function to the OnChange event of every field on the form, ensuring the ribbon refreshes when a value changes. But you can imagine waste of time for the initial setup and the nightmare it would be to maintain 🤢.
Instead, I found this nifty solution provided by Andrew Butenko in the thread below.
🔗https://community.dynamics.com/forums/thread/details/?threadid=2d8cfb18-13e4-403d-8e13-de5c2f27959c
The goal here is to add a function on the OnLoad of the form that will dynamically register an OnChange event on every attributes of the underlying record. 👉This is a very cool pattern that can be applied to many other use cases.
function onLoad(executionContext) {
	let formContext = executionContext.getFormContext();

	formContext.data.entity.attributes.forEach(function(a){
		a.addOnChange(function(){
			formContext.ui.refreshRibbon();
		});
	});
}
Last step is to configure the OnLoad event on the form to execute the function above and we are good to go.

Testing the solution
Now, as we can appreciate in the clip below, the custom buttons will automatically disappear whenever the form’s state is Unsaved and reappear upon saving the form.
Hope this helps 😎!
Links

Photo by Stormseeker on Unsplash
Be First to Comment