
In-App notifications for PowerPlatform model-driven apps has been released in public preview (see official Microsoft blog post below). I am particularly excited about this new feature as it opens up very interesting scenarios that can have a significant impact on the user experience.


Before you can start flooding your users with all those cool notifications, since its a preview, the very first action to take is to enable the feature at the app-level.
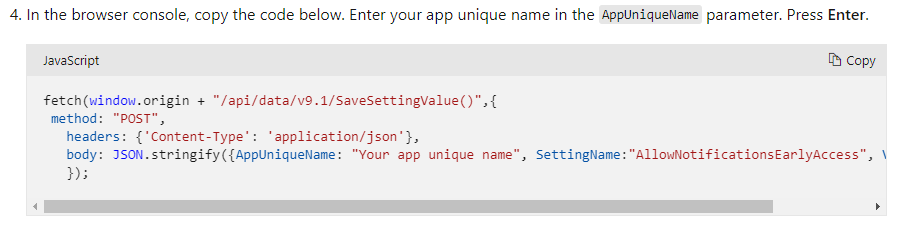
It is not possible to enable the feature in the user interface of the Maker Portal. Therefore we need to rely on some coding magic to make things happen. In this case, the official documentation suggest sending a JavaScript command using the browser console.
Keep in mind that the feature will most probably be enabled by default in the future and we won’t have to execute the command at all.
What this code does is simply calling an out-of-the-box action called SaveSettingValue, and setting a parameter called AllowNotificationsEarlyAccess to true.
Not very complicated but also not very citizen-friendly either 🤷.
Enable In-App notifications with a Flow
Let’s see how we can use a very simple Power Automate Flow to achieve the same result. That way, we can have a centralized and generic way to enable and disable in-app notifications in any model-driven app of an environment.
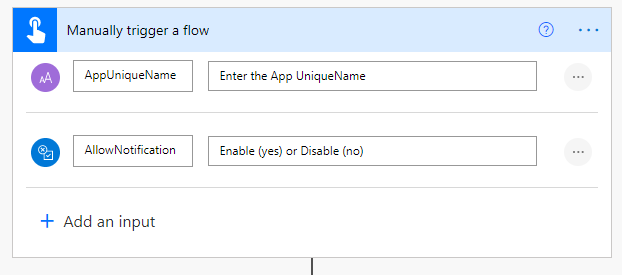
1️⃣ Setup the Trigger
For the example, I will make use of the Manual Trigger for the Flow.

Since I want the Flow to be generic and reusable, there will be 2 input values that we will expect to receive from the caller of the Flow.
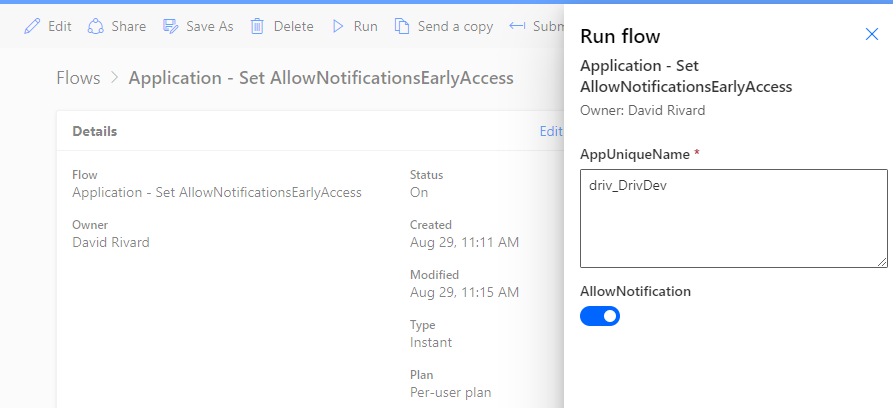
- AppUniqueName (string) : This is the uniquename of your model-driven app
- AllowNotification (yes/no) : switch to enable ✔️ or disable ❌ the feature
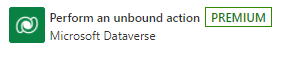
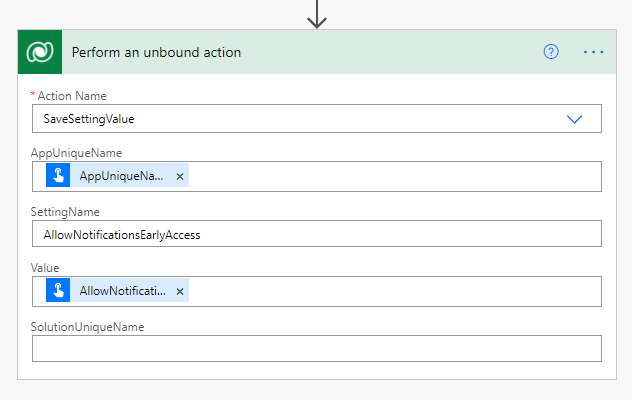
2️⃣ Call SetSettingValue Action
To call this action we will use the Perform Unbound Action step of the Dataverse connector.
Choose the SaveSettingValue action from the dropdown list and map the AppUniqueName and Value parameters to the corresponding Inputs received from the trigger. The SettingName can be hardcoded to ‘AllowNotificationsEarlyAccess‘.
3️⃣ Run the Flow
Now you just need to run your Flow to enable and/or disable the feature in any model-driven app deployed in your environment.
Just pass the AppUniqueName and AllowNotification (true/false) input parameters.
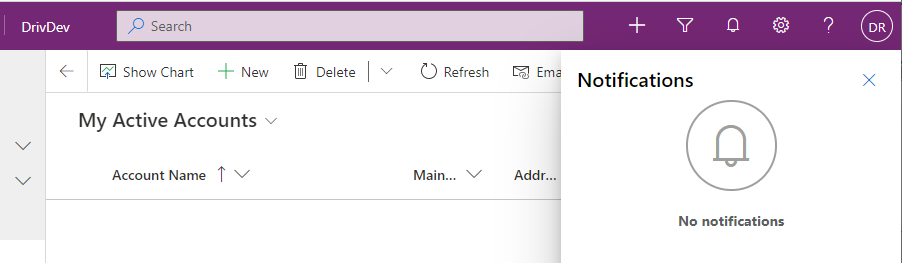
After you run the Flow, you will still need to manually publish your app in the maker portal. Once published, log in to your app and you will see a 🔔 bell icon on the top ribbon. Clicking on this icon will pop-up the notification center of the logged-in user.

That’s all there is, you can now start to send In-App notifications to your users, see the link below for some examples.
I will surely explore the possibilities in future blog post and I’m very curious to see how developers will make use of this shiny new toy ✨.
You can download and import the Flow I used in the example here :
Photo by Chris Leipelt on Unsplash
[…] Enabling With Power Automate – Enable Model-Driven In-App Notifications with Power Automate – It Must Be Code! […]
Salut David,
Setting the value is now supported directly in solutions (https://docs.microsoft.com/en-us/powerapps/maker/data-platform/create-edit-configure-settings); yay for citizen-friendly features! 🙂
Hi Brigitte,
Yeah I knew this post would have a short life 😉
Very good to see that the feature can now be set directly in the maker portal.
Next step, I hope It can be enabled by default.