As a Power Platform developer, I have always been a strong advocate for the use of early-bound classes in customization projects that targets Dataverse tables and actions. Early-bound classes not only increase code readability and maintainability, they also significantly reduce the risk of errors. I think that being proficient and fast in generating early-bound classes is a must-have skill for any developers who works with the platform.
Recently, the Microsoft Power Platform CLI (PAC CLI) introduced the new modelbuilder command group that enables early bound classes generation directly from the CLI. Traditionally the generation of early-bound classes was primarily accomplished through a specialized tool called CrmSvcUtil. Yet, integrating these capabilities into a more versatile and widespread tool like PAC CLI is a logical step forward that will undoubtedly improve user adoption in the long run.
This post takes a closer look at the PAC CLI modelbuilder, delving into its inner workings and examining some of the key command group switches and their impact on the resulting classes. Additionally, we’ll explore how to effectively generate these classes on the fly within a Dataverse plugin project.
But first, let’s recap on the early-bound classes concept.
Early bound classes
In Dataverse, early-bound classes are used to provide a strongly-typed representation of the Dataverse tables (entities), columns (attributes) and choices (optionsets) in .NET languages, such as C# and VB.NET.
Typically, a code generation tool establishes a connection to the target Dataverse organization and inspects the metadata to create a collection of classes that represents each entity and its attributes as a corresponding property within that class.
By using early-bound classes, developers can write code that references Dataverse entities and their attributes using strongly-typed objects, rather than using string literals (a.k.a. magic strings). This makes the code more readable, maintainable, and less error-prone.
Furthermore, early-bound classes provide compile-time type checking, which helps to detect errors early in the development process, rather than catching them at runtime. They also provide intellisense, making it easier for developers to discover and use available entities and attributes.
As an example, the following screenshots compares early-bound vs late-bound coding style. You can appreciate the difference in style and readibility. I personally find the late-bound notation hard to understand.


PAC CLI modelbuilder
That being said, let’s explore the new modelbuilder command group of the PAC CLI to produce these early-bound classes.
Pre-requisites
There are some prerequisite to use the PAC CLI, the first one is to have it installed on your computer. You can find the official docs here, but the easiest way is to install it through the Power Platform Tools Visual Studio Code extension. This will install the CLI globally on your machine and you’ll be able to use it from any command prompts.

Now, before generating the classes, it is necessary to connect to an actual Dataverse environment. There are several methods to create connections using the CLI but for the simplicity of the post, we will use this type of command :
pac auth create --url https://{yourenv}.crm.dynamics.com --name {yourenv-friendly-name}Issuing this command will pop-up an account sign-in screen where you can enter your credentials and connect to the desired environment

Once authenticated, the connection will be created and selected as the active connection.

For more in-depth information on creating and managing Dataverse connections with the CLI, check out this helpful blog post.
Simple modelbuilder command
Now that we are connected to a Dataverse environment, we can issue modelbuilder commands to generate early-bound classes. Please refer to the official documentation of the PAC CLI below for the most up to date information.
Microsoft Power Platform CLI modelbuilder command group - Power Platform | Microsoft Learn
In its simplest form you can issue a command like this one.
pac modelbuilder build --outdirectory Models --serviceContextName XrmContext --namespace ModelBuilderTestHere’s a brief explanation of the parameters and switches.
--outdirectory
This is the directory where the early-bound classes will be created. the directory can be a full path (ex. C://MyOutputPath) or a relative path to the folder where the command is executed.
--serviceContextName
This is the desired name of the generated ServiceContext class. It creates a class in the output directory that extends the OrganizationServiceContext from the SDK and provides Queryable collections for every tables (entities) present in the model, thus enabling the usage of LINQ queries over the Dataverse table data. I personnaly use the name ‘XrmContext’.

With a servicecontext instantiated you can now produce powerful and easy to understand queries on the business model.

More on OrganizationserviceContext here
OrganizationServiceContext Class (Microsoft.Xrm.Sdk.Client) | Microsoft Learn
--namespace
This is the desired namespace that the code generation tool use for every generated files
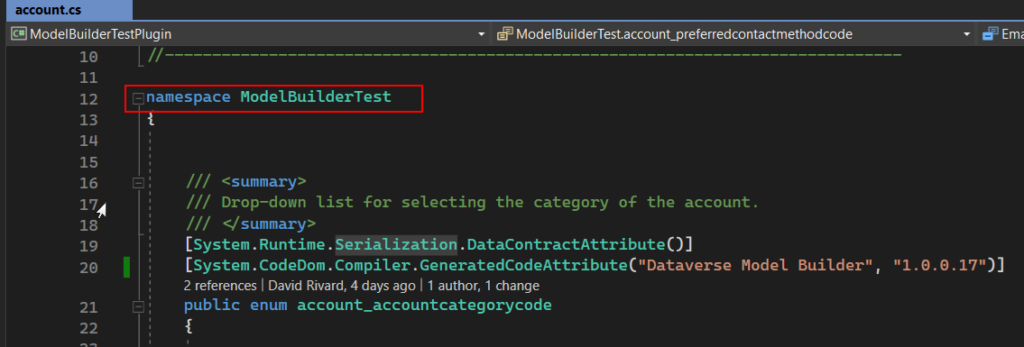
Running the command will generate a bunch of files in the folder specified in the –outdirectory parameter. The Entities folder will contain one file for each tables detected and the OptionSets folder will contain enums representing the global choices (optionsets)


The main problem with this pac modelbuilder statement is that it generates huge amount of files (1 file for every tables in the environment) weighing around 25 MB and it took about 2 minutes to completes. In a real life project you should only generate the early-bound classes for the tables that are needed in the business logic of your project.

Let’s see how to optimize the ouput files using other available switches.
Optimized modelbuilder command
There are numerous other switches and parameters available in the modelbuilder command group that will have an effect on the gerated code and files produced, here are the most notable.
--entitynamesfilter
When working with early-bound classes in a customization project, chances are that you’ll only need to target a small subset of tables to perform your business logic. The entitynamesfilter parameter in allows the user to provide a semicolon-separated list of table names to filter the exported table classes accordingly.
For example, if you only want to use Accounts and Contacts use the following :
–entitynamesfilter “account;contact”
--generateActions
generateActionsWhen included, this switch will include early-bound classes for Actions and CustomApis. Actions classes exposes robust and easy to use wrappers around actions/customapi request and response calls.
See how easy it is to consume a custom api with early-bound classes with the example shown below. I’m using the GetEnvironmentVariable that is part of my generic Custom API collection project.

--messagenamesfilter
This is used to filter the generated messages/actions classes. Same idea as the entitynamesfilter, you can provide a list of Actions/CustomAPI separated with a semicolon
🐛There is currently slight bug with this feature, to correctly filter the desired actions you need to add a wildcard '*' at the end of each actions/customapi present in the filter list. I have opened an issue on the CLI github repo and hopefully it will be resolved soon.

pac modelbuilder - generateActions and messagenamesfilter inconsistencies · Issue #495 · microsoft/powerplatform-vscode (github.com)
--emitfieldsclasses
Adding this switch to your model generation command will generate constants out of the fields name of each table in your model.
As seen below in the generated account.cs file, this will add a static class called Fields inside the Account class that lists all the fields of the account table as string constants.
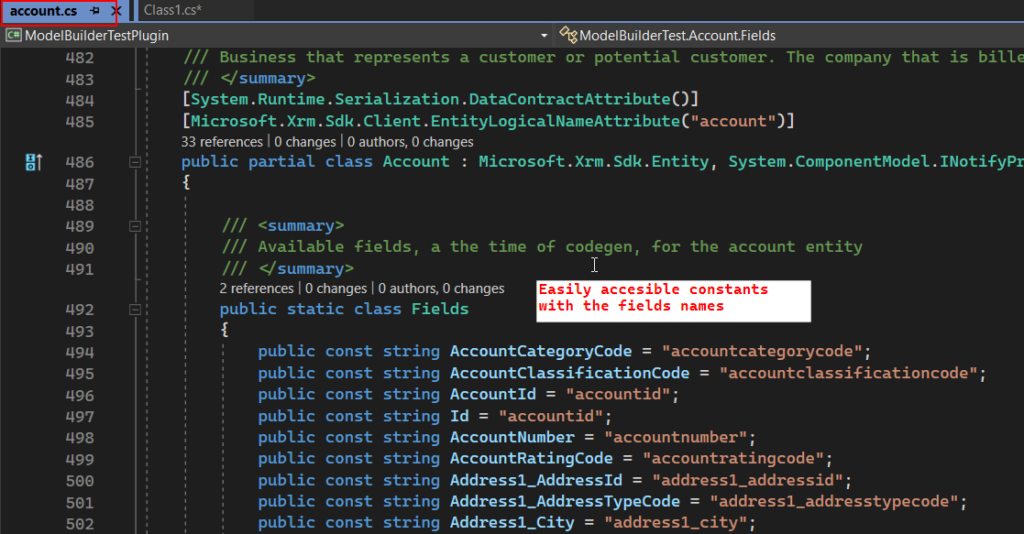
Those constants are then easilly acessible troughout the codebase. This feature is particularly useful in reducing the use of magic strings when you need to fall back to late-bound style for any reason. As demonstrated in the example below.
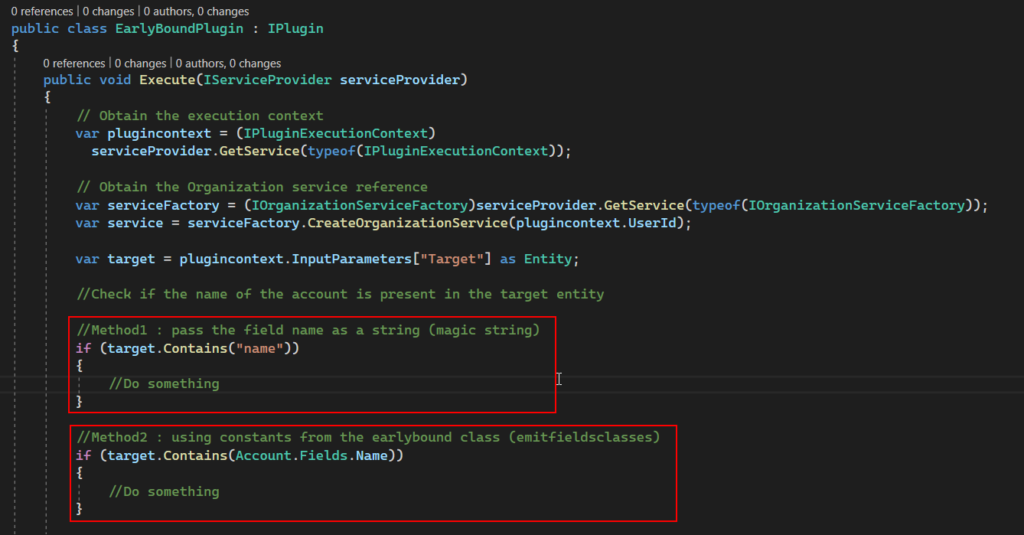
As far as I know, this is a unique feature of the PAC CLI modelbuilder and is not possible when using the (older) crmsvcutil tool. Thus, I highly recommend incorporating this switch for model generation.
--generateGlobalOptionSets
If you include this switch, this will emit classes for all the global optionsets (choices) present in the environment. If you omit the switch, only the global optionset used in the entities produces by the model will be generated. So as a rule of thumb I don’t use it.
--suppressGeneratedCodeAttribute
This switch will remove a bit of noise in the output files by removing unecesary and redundant lines of code. If you are a neat freak, you’ll definitely want to use it.

suppressGeneratedCodeAttribute switch--suppressINotifyPattern
By default all properties will expose a INotify pattern that can be used in your code. Issuing that switch will remove the pattern implementation and delete 2 lines of code per properties. I personally never used this pattern in my projects so I’m using the switch.
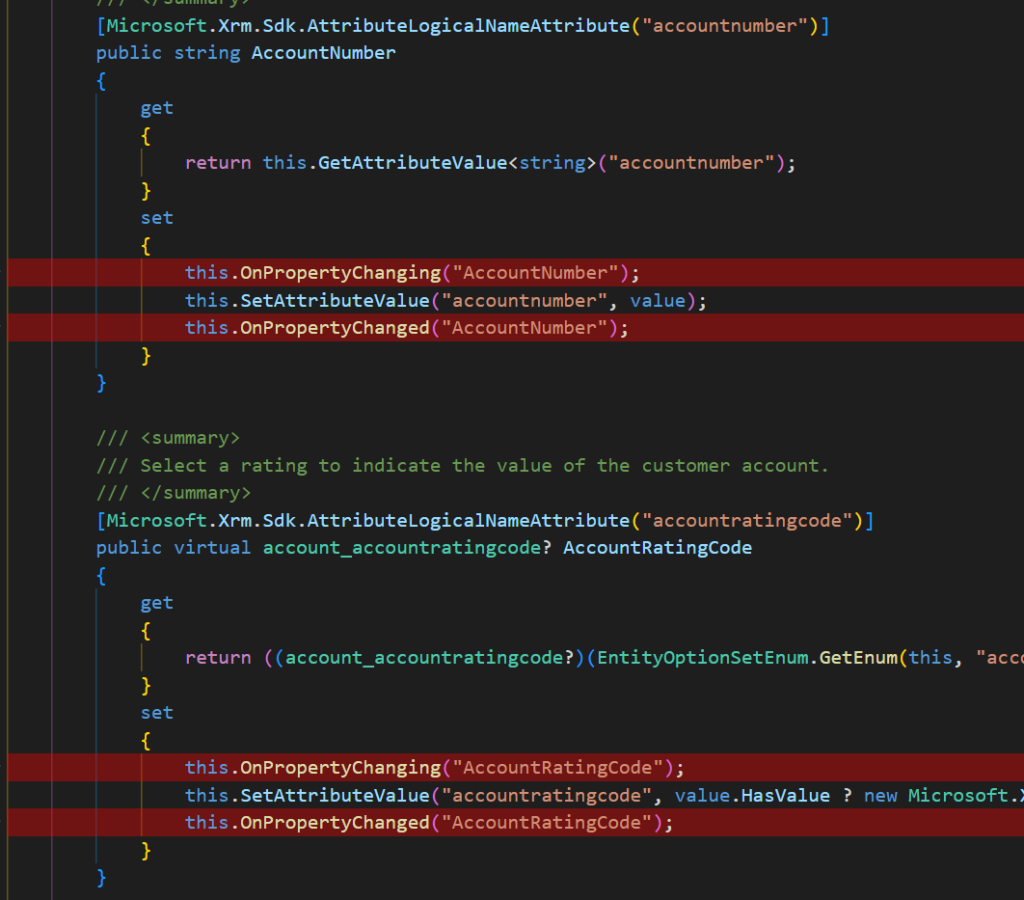
suppressINotifyPattern--writesettingsTemplateFile
Using this switch will produce a builderSettings.json file in the output directory.

The builderSettings.json file will contain a representation of all the parameters and switches used in the issued pac modelbuilder command. As we will see in the next section, this file can be put in source control and reused on demand.

My final optimized statement will look something like this
pac modelbuilder build
--outdirectory Models
--serviceContextName XrmContext
--namespace ModelBuilderTest
--emitfieldsclasses
--entitynamesfilter "account;contact"
--generateActions
--messagenamesfilter "driv_GetEnvironmentVariable*"
--suppressGeneratedCodeAttribute
--suppressINotifyPattern
--writesettingsTemplateFile
Having limited the number of tables and actions only to what’s needed, the whole operation is completed in a couple of seconds and the Models folder weighs around 300 kb, that is much better.
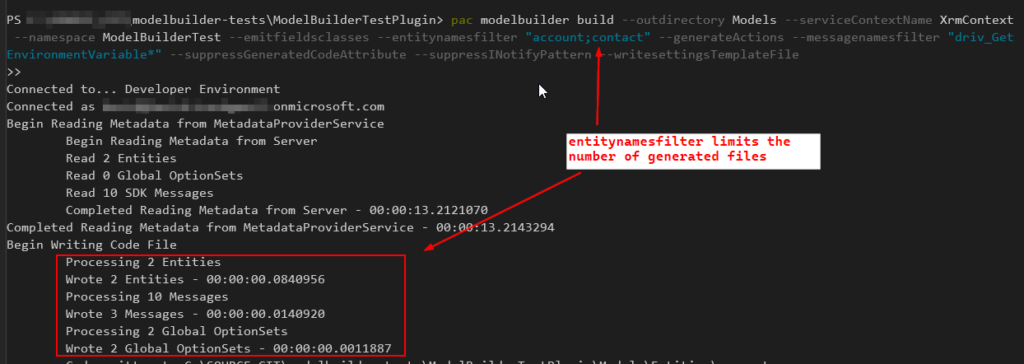
All this is great, but not very practical in a real-life project. I want to be able to regenerate the classes on-demand as my project grows in complexity and I don’t want to have to remember this big command. Most of all I want to store the configuration in source control where it can be reused by other team members.
Let’s push this a bit further and simplify our lives with the use of a template file.
Generate classes from a template file
As seen in the previous example, the --writesettingsTemplateFile switch will produce a builderSettings.json that can be used as template to feed into the PAC CLI. In fact, once you have a template file, you dont even need to issue commands that contains all these switches and parameter. You can grab this one as an example to build upon.
Instead we will use thesettingsTemplateFileparameter to supply the settings to the command.
--settingsTemplateFile
This parameter expects the name of the file that contains the parameters and switches. If the file is not located in the directory from where you are issuing the command, put the full path.
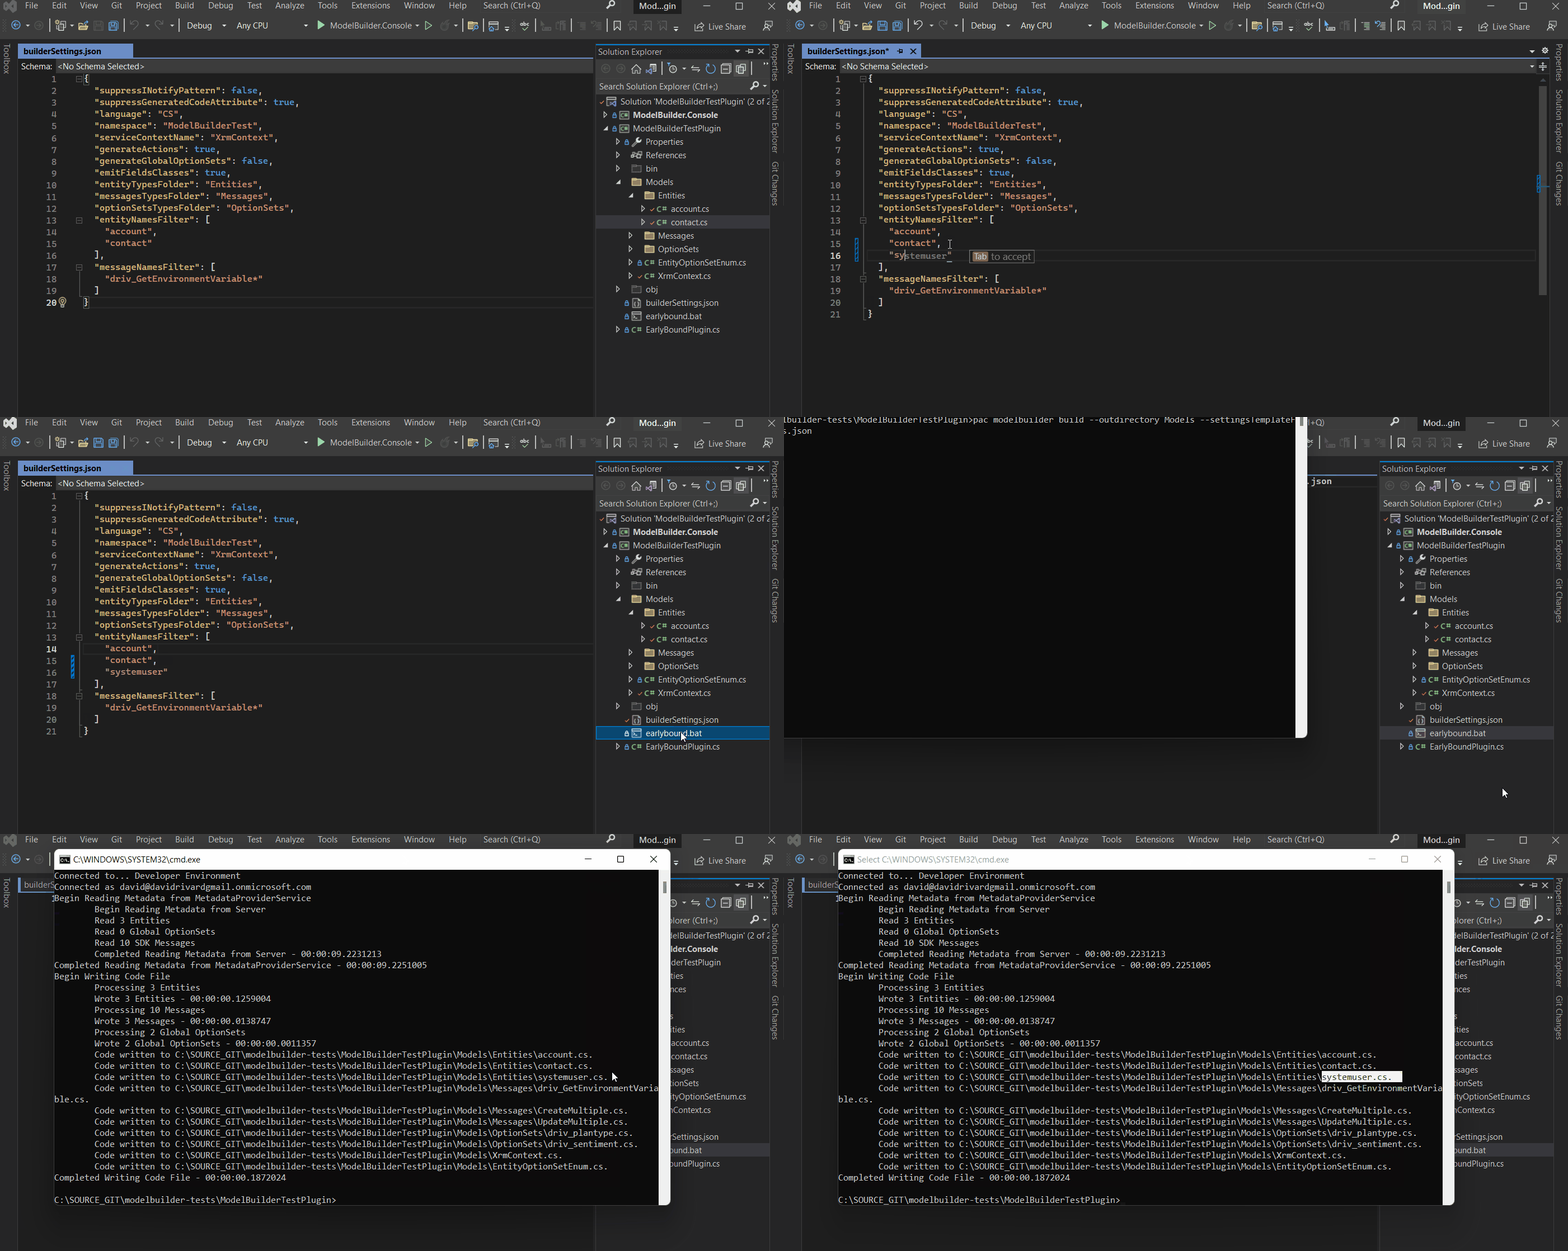
With this, the command to issue is way more simple, as you only need to provide the output directory and the template file. This file can be stored in source control and can evolve throughout the project’s lifecycle.
pac modelbuilder build --outdirectory Models --settingsTemplateFile builderSettings.jsonWith all the necessary components in place, we can now easily generate the early-bound classes on demand as your model and business logic evolves.
An example is shown below, with a Dataverse plugin project containing a builderSettings.json file and an earlybound.bat file that runs the PAC CLI command at the project root. Simply executing the .bat file allows for quick and efficient generation of the classes.
Limitations
Here are some limitations I came upon during my experimentation.
Models folder not cleared
The model folder is not cleared between each modelbuilder invocation. Meaning that if you remove a table from your desired early-bound classes, the file that was created from an earlier call would not be deleted. This could potentialy cause noise and unwanted behavior.
There's an issue on the PAC CLI repo regarding this :
[Feature request] Add clobber option to `pac modulebuilder build` · Issue #365 · microsoft/powerplatform-vscode (github.com)
Therefore I advise to find a way to clear the folder before generating the classes.
Lots of files to include in the .csproj
I really like that the generated model files are well separated in folders and having one file per artifact (tables, choices, messages) as it’s easy to understand and visualize the outputs. But one of the drawback is when used in a C# class library project, everytime a new file appears in the models folder, it must be manually included in the project.

You can mitigate this by modifying the .csproj file so that any new files (or deleted filed) that appears in the models folder gets picked and included in the project automatically. By including the following lines :
<Compile Include="Models\*.cs" />
<Compile Include="Models\Entities\*.cs" />
<Compile Include="Models\OptionSets\*.cs" />
<Compile Include="Models\Messages\*.cs" />

I had some issues with this technique as sometimes, I had to shut down and restart the project to get the files included or the include statements gets re-written for no reason.
For that reason I would like to have the possibility to emit the generated models in 1 single file that would be included in the project. I know its a bit of an anti-pattern but this was possible with the CrmSvcUtil tool.
Early Bound Generator V2
All the examples shown up to here were done using the PAC CLI directly, but you might want to have a look at the Early Bound Generator V2 for XrmToolBox by Daryl Labar. The tool leverages the PAC CLI modelbuilder and adds a lot of extra features including mitigation for the limitations listed above.
Early Bound Generator  · XrmToolBoxEarly Bound Generator  · XrmToolBoxEarly Bound Generator  · XrmToolBox

Early Bound Generator V2 (linnzawwin.blogspot.com)
Takeaway
That’s it for now, It was a lot to cover.
I hope this post has shed light on the benefits of using the PAC CLI to generate early-bound classes for your Dataverse projects.
Photo by Pierre Bamin on Unsplash

Thanks for the writeup.
Do you know how to set the namespace per OptionSets and Entities? It creates a folder for each but under same namespace thus not following the file location
Glad you like the post 😉
I don’t think that you can change the namespace to follow the file location
For me it makes sense in a way, you will only have to reference one namespace on any file that requires the use of the early-bound classes.
Hi, do you know if is possible to alias entity names? eg if you generate the Task entity then the code will complain when using the async Task. So aliasing Task as CrmTask would be nice
I don’t think its possible using out-of-the box capabilities unfortunately.
Only solution I can think of its having post-generation code of some sort that would scan the outputs and given a list of aliases change the output files accordingly. Not super user friendly.
Thank you so much. This really helped me understand some code I had been provided. I have only ever used late bound and I found it difficult to understand what was occuring.